

Fitting Wood Flooring onto Existing Floorboards
Mechanical fixing of wood flooring is arguably the most successful method of fitting as it is the way that wooden floors have been traditionally fit for many years. A wood floor can be mechanically fixed over any sub floor which is thick enough to adequately take a nail or screw (e.g. building grade chipboard, existing timber floorboards). All our Solid Wood Flooring and our 20mm Engineered Oak Flooring can be mechanically fixed as set out below.
Mechanical fixing means nailing or screwing the wood floor down onto joists, battens, subfloor or existing floorboards. Although there are several ways of achieving this such as pre-drilling and screwing or face nailing, by far the most popular method is to ‘secret nail’ or ‘secret screw’.
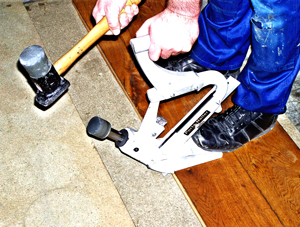
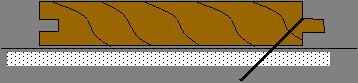
When secret nailing, a nail gun is used to drive a special flooring nail at between 33° and 45° through the side of the tongue joint (as above). This method is quite fast as the gun positions the nail in exactly the right place, and then it is simply hammered home. It does however require the use of a nail gun, which may bear an additional cost if hiring is necessary.
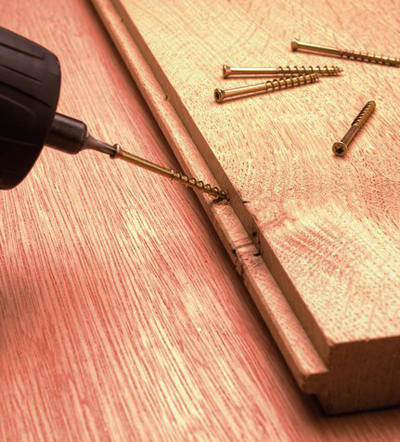
Increasingly popular are the specially designed Tongue-Tite Wood Flooring Screws which are fixed in a similar way to nails but do not require a nail gun. A special star driver is included in each box of 200 screws, which will fit into any standard power screwdriver or drill. Simply position the screw at a 30° angle on the tongue joint and these superb little screws will pull the boards together nice and tightly. They are self piloting and countersinking, so no pre-drilling is required. Unlike nails, they don’t work loose over time which can result in creaking floorboards.

Once you have decided whether to use Tongue Tite screws or hardwood flooring nails, inspect your subfloor thoroughly. Ideally, when fitting onto existing timber floorboards, your new wood floor should run 90 degrees perpendicular to the run of the existing boards. This is to ensure that the boards are fully supported underneath. If you wish to run the new floorboards in the same direction as the existing floorboards, for aesthetic reasons, the existing boards can be overlaid with plywood. Existing floorboards should be sound and securely fastened to the joists beneath. If they are not sound, make good any defects or overlay with plywood. When your subfloor is fully prepared, pin a layer of building paper over the whole floor, particularly at ground floor level. Once the subfloor has been prepared then you can start to nail or screw the hardwood floor down, allowing for an expansion gap around the perimeter of the whole floor. How you intend to cover the expansion gap will dictate what space you allow, as follows:
- Leave ½" expansion gap from the wall and cover with skirting boards. This is the neatest option but entails removing existing skirtings and re-fitting or replacing (diagram 1).
- Leave a 1" expansion gap from the existing skirting and cover with low profile bead. This is an easier option and is still neat as the beading is unobtrusive (diagram 2).
- Leave ½" expansion gap and cover with either quadrant or scotia bead. This is the cheapest option but the beading does 'ride up' the skirting by ¾" which may be a problem, particularly on shallow skirtings (diagram 3 and 4).
- Undercut the existing skirting boards with bear saw and position the floorboards so that they neatly run just underneath (diagram 1).

Although the expansion gap should be left around the perimeter of the whole room (including any doorways), it is important to understand that any movement that may occur will be across the width of the boards and not in the length. Keep this in mind when planning the run of the boards. Choose the wall that you want to start from, this will usually be the longest wall. The first one or two rows of boards will have to be face fixed (i.e. vertically). First pre-drill a fine hole, nail through into the sub floor, sink the nail head with a punch and fill. Be careful that the nails used are suitable flooring nails and that they will not penetrate further than the sub floor. As you start to secret nail/screw the boards down, take care to ensure that the joints are completely random (see diagram below).

Try not to line joints through or set the floor out brickwork style. If you have a floor that has a variegated pattern such as brown oak, ash, coloured maple or fumed oak, ensure that you open several packs at a time in order to ensure an even spread of tones and grain pattern.
Nails or screws should be at 6" to 8" centres with a nail/screw a couple of inches either side of joints. Once you reach the far wall you will need to face secure the last one or two rows of boards as before.
When fixing the floor a few points should be borne in mind:
- The boards should fit up snugly together, if not there is a good chance that there is some debris in the groove or a tongue is damaged. Clear this before fixing.
- Flooring should not be scribed around areas like architraves and casings. These should be undercut by hand or with a jamb undercut saw so the flooring can neatly slide under. Remember to leave some gap for expansion.
- When fitting around radiator pipes a 20mm hole (for 15mm pipes) should be drilled in the floor to allow for expansion. The floor should then be cut out as below.
- Carefully mark the position of the pipe.
- Drill a clearance hole.
- Mark out out a 15° wedge.
- Cut neatly down the lines with a fine tooth saw.
- Push the wedge back in and file to circle again.
- Slide back over the pipe and glue wedge in place.
- Fit a pipe cover in a matching timber.
For further advice on fitting and finishing your wood flooring call us on 01535 637755 or follow the link to download our free Hardwood Floor Fitting and Maintenance Guide.